
These instructions ensure Apiboost maintains its connection to Azure APIM for managing API products, subscriptions, and user metadata.
To maintain the Apiboost-Azure connection, follow these steps:
-
Retrieve your Azure Tenant ID
-
Register a new Azure App
-
Generate system credentials
-
Configure RBAC for API Management access
-
Store credentials in Apiboost
You must have access to a system level admin in Azure Portal and Entra to be able to complete this guide.
Retrieving your Tenant ID
This section will cover how to retrieve your Tenant ID from Azure Portal.
If you have multiple tenants, ensure that you select the Tenant that is connected to the Resource Group that your API Management is registered under.
-
Log in to https://portal.azure.com
-
In the top navigation, click the hamburger menu → click Microsoft Entra ID.
-
In the Overview section, find your Tenant ID and copy it.

-
Store the Tenant ID in a separate document.
Register a new Azure App
-
Navigate to Microsoft Entra Admin UI.
-
In the lefthand column, expand Manage and click
App Registrations. -
In the main content section, find the tabbed navigation and click
+ New Application. -
Provide all information needed to create the app:
-
Name: A user facing name that will be visible if using the App for SSO Authentication in Apiboost.
-
Supported Account Types: Determines who has access to this application. For most instances, a Single Tenant option will work. However, for more advanced Azure setups with multiple tenants & user directories, multi-tenant could be selected. For our guide, we will select single tenant.
-
Redirect URI: Leave this blank unless configuring for SSO. If you would like to allow users to authenticate with their Entra Account in Apiboost, please follow this tutorial to setup. For now, we will leave this blank.
-
-
Click Register.
-
Once the registration process has completed, store the
Application (client) IDwith your Tenant ID.

-
Now that the new App is created, we will go ahead and configure permissions to use the Azure Management APIs.
-
In left hand menu, click API Permissions + Add a Permission
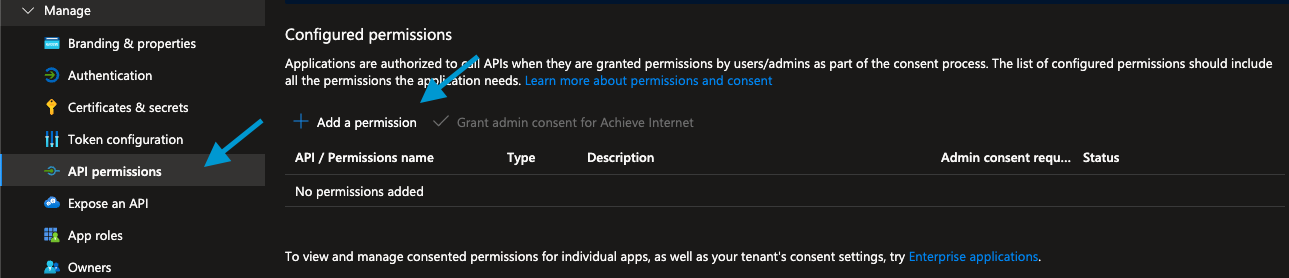
-
Select Azure Service Management and check
user_impersation
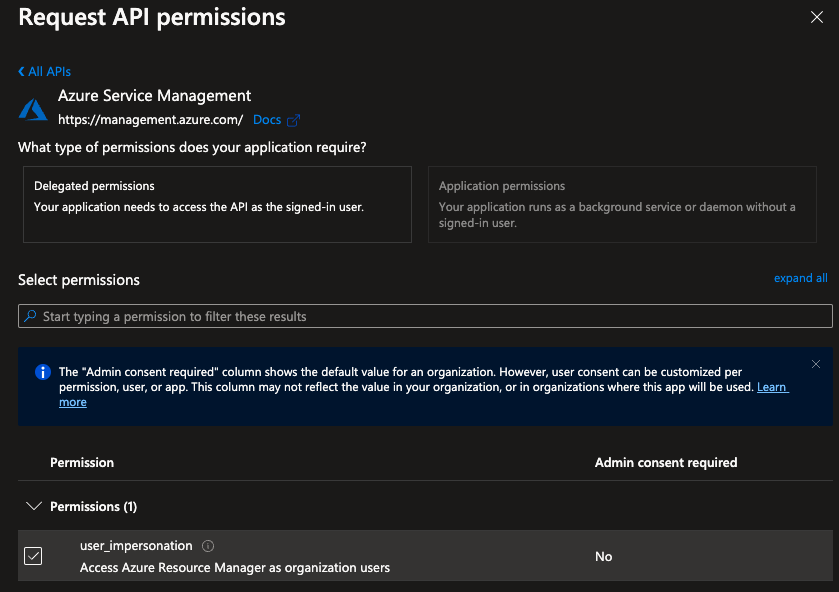
-
Click Add Permissions to save.
Generate System Credentials
For accessing Azure API Management entities via Microsoft ARM APIs, we must generate system level credentials for Apiboost to use to request authorization tokens as. Roles and permissions will be configured on the API Management service itself so these credentials are simply to inform Azure that we are who say we are.
-
While viewing the overview of your Azure App, expand the
Managemenu in left hand navigation. -
Click Certificates & Secrets menu item.
-
In the main content area, click Client Secrets and
+ New client secret
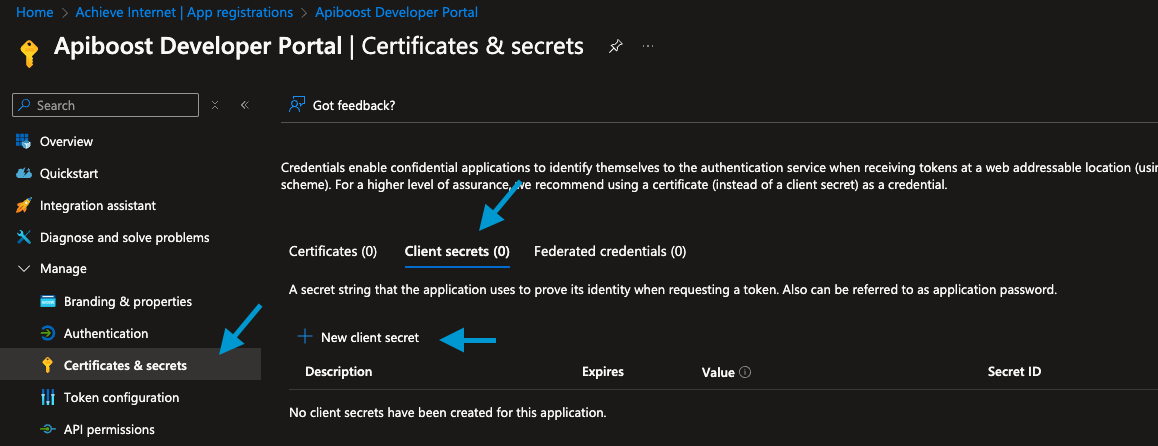
-
Enter a description of your choice and an expiration date.
The length of expiration is dependent on the needs of your organization. If you do not have any business rules or requirements from security teams, we recommend 12 months expiration.
-
Click Add to save the credentials. Once the process completes, you will be able to copy your Secret Value. The secret value will be hidden after you leave this screen. Copy and store it securely.

Assign Service Admin Role to App in APIM
-
Navigate to https://portal.azure.com
-
Navigate to your APIM instance.
-
On the overview, click Access control (IAM) in the left hand navigation.
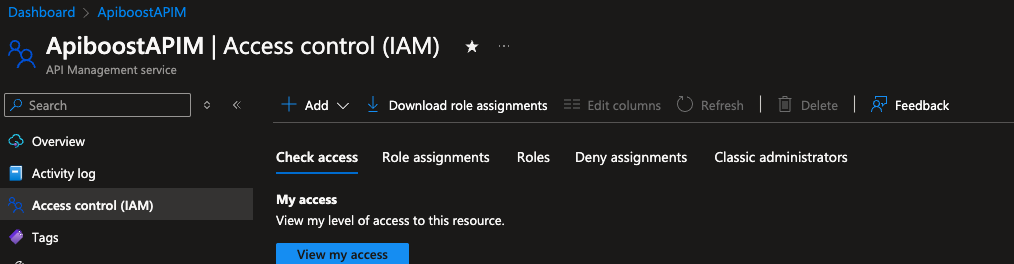
-
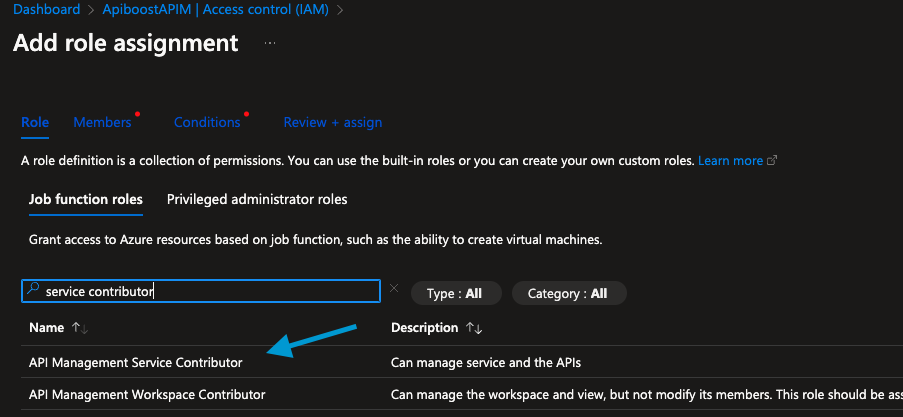
Click Add → Add role assignment
-
Under
Roletab, clickAPI Management Service Contributorto select.
-
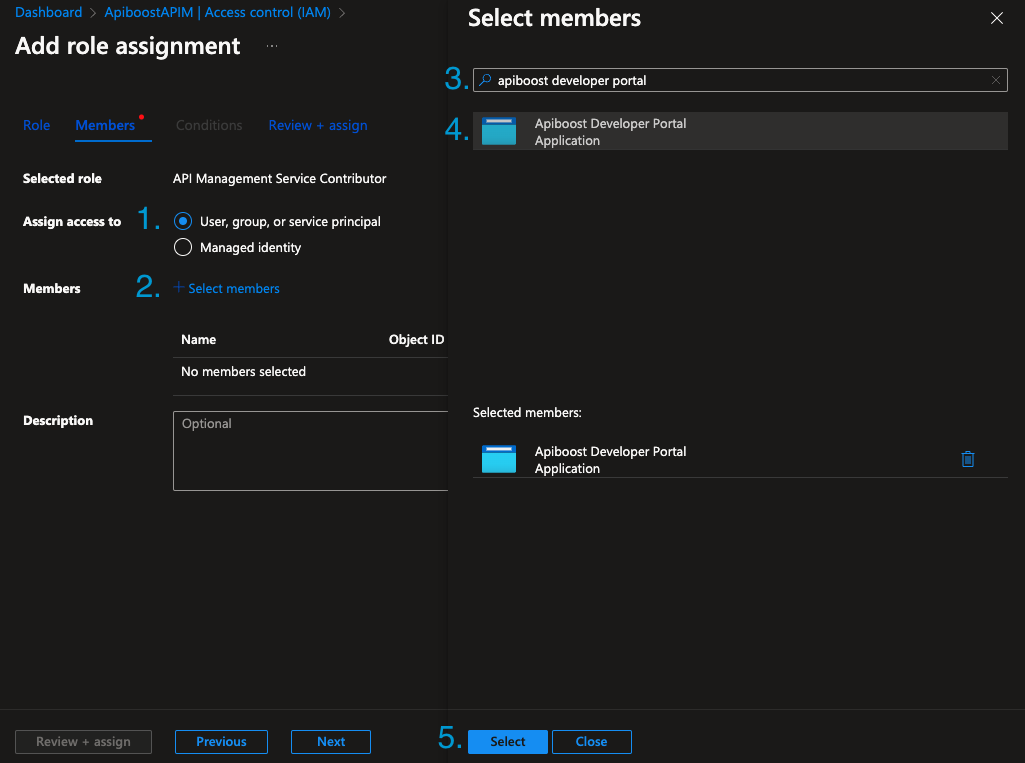
Under Members tab, by default
User, group, or service principalis selected. If not, select it. -
Click
+ Select Members -
Search for the name of your App and click to select.
-
Click Review & Assign to save.
-
Under Role Assignments tab on the IAM overview, you will see your service principal listed under
API Management Service Contributor.

Congratulations! Everything has been configured in Azure to connect Apiboost to your APIM instance. Now, let’s add the configurations that were copied during the steps above into Apiboost to finalize the connection.
Subscription ID, Resource Group ID & Service Name
In order to make requests to the correct instance of your Azure API Management resource, we will need to retrieve and store the Azure Subscription ID, Resource Group ID and Service Name. These values can be found by performing these steps:
-
Navigate to your APIM instance Overview section.
-
Click JSON View in the top right hand corner.

-
With the JSON View expanded, you can copy the Resource ID

-
Optionally choose an API Version that you would like to use. Some administrators enforce API Version, however Apiboost will use the latest API Version available unless otherwise specified in the Admin UI.
Need more help? Contact us today for assistance.